Monday, February 28, 2011
Sunday, February 27, 2011
Andrew Thorton - Artist and Writing & PJ Tool Giveaway
http://andrew-thornton.blogspot.com/
I just found his blog, take a look...you'll enojoy his blog.... and there's a link for a great giveaway from PJ Tool (great metal stamps!) If I win those, look for a tutorial and some giveaways.
http://www.pjtool.com/metal-jewelry-stamps.aspx
I just found his blog, take a look...you'll enojoy his blog.... and there's a link for a great giveaway from PJ Tool (great metal stamps!) If I win those, look for a tutorial and some giveaways.
http://www.pjtool.com/metal-jewelry-stamps.aspx
Saturday, February 26, 2011
Millie Gift Smith Wet and Dry Watercolor Techniques
<object style="height: 390px; width: 640px"><param name="movie" value="http://www.youtube.com/v/Q67a_KK-ouI?version=3"><param name="allowFullScreen" value="true"><param name="allowScriptAccess" value="always"><embed src="http://www.youtube.com/v/Q67a_KK-ouI?version=3" type="application/x-shockwave-flash" allowfullscreen="true" allowScriptAccess="always" width="640" height="390"></object>
Millie Gift Smith Demonstration Green watercolors
<object style="height: 390px; width: 640px"><param name="movie" value="http://www.youtube.com/v/i1a-JXskJSk?version=3"><param name="allowFullScreen" value="true"><param name="allowScriptAccess" value="always"><embed src="http://www.youtube.com/v/i1a-JXskJSk?version=3" type="application/x-shockwave-flash" allowfullscreen="true" allowScriptAccess="always" width="640" height="390"></object>
Millie Gift Smith Getting started with watercolors
<object style="height: 390px; width: 640px"><param name="movie" value="http://www.youtube.com/v/YK3sY5elaf4?version=3"><param name="allowFullScreen" value="true"><param name="allowScriptAccess" value="always"><embed src="http://www.youtube.com/v/YK3sY5elaf4?version=3" type="application/x-shockwave-flash" allowfullscreen="true" allowScriptAccess="always" width="640" height="390"></object>
Cristobal Ortega Paints with his hands... rapidly
<object style="height: 390px; width: 640px"><param name="movie" value="http://www.youtube.com/v/fjkL_3m28tY?version=3"><param name="allowFullScreen" value="true"><param name="allowScriptAccess" value="always"><embed src="http://www.youtube.com/v/fjkL_3m28tY?version=3" type="application/x-shockwave-flash" allowfullscreen="true" allowScriptAccess="always" width="640" height="390"></object>
Easy Abstract
<object style="height: 390px; width: 640px"><param name="movie" value="http://www.youtube.com/v/29lDm99FA-g?version=3"><param name="allowFullScreen" value="true"><param name="allowScriptAccess" value="always"><embed src="http://www.youtube.com/v/29lDm99FA-g?version=3" type="application/x-shockwave-flash" allowfullscreen="true" allowScriptAccess="always" width="640" height="390"></object>
Thursday, February 24, 2011
Jamie Tate - Abstract Artist
Oh, if money was not an issue... each and every artist featured on my blog would have their lovely artwork hanging in my home.... so until I win the lottery, this blog will have to do.
Jamie Tate's work is lovely.... Check out her web site!
http://www.jamietate.com/index.htm
Jamie Tate's work is lovely.... Check out her web site!
http://www.jamietate.com/index.htm
Wednesday, February 23, 2011
Cathy Hegman - Great Artist
http://cathyhegman.blogspot.com/ Check out her blog and her lovely work.... encaustic work is difficult...her offerings are beautiful.

Giant Head Masks of Jane Filer - How To

Ok, I admit it, these giant head masks both intrigue and amuse me..... her ability to see the possibilities in everything is refreshing. Just for a day, I'd love to crawl inside her brain and laugh and play.
Thank you Jane Filer... finding your blog made my day!
http://www.squidoo.com/jane-filer-giant-heads


Myrna Wacknov Paintings on Tyvek

I love Myrna's work and would love to take a class with her......... wish she was in my area of the country.
http://myrnawacknov.blogspot.com/
http://www.myrnawacknov.com/
Tyvek
Tygerag (synthetic paper) 23″x17


Monday, February 21, 2011


Gary Reed Tshirt Transfer Paper onto Wood
Preheat the iron for about 5 minutes, iron on with circular motion
Gampi Paper Transfer
<iframe title="YouTube video player" width="480" height="390" src="http://www.youtube.com/embed/ej90osA8BK0" frameborder="0" allowfullscreen></iframe>
Use Polymer medium and water to make it as clear as possible
Can attach it to a carriere paper and run it through your inkjet printer
Spray Gampi with workable fixative before putting it on a surface
Always wet area that gampi will go on first before applying it.
Make a cross with your brush and go out from center to push wrinkles out.
Can do tranfers with tonor based images onto Gampi... with colorless Blender Chartpak (?)
Sunday, February 20, 2011
Expressive Painting Steve Aimone
Steve graciously offers FREE online class -
http://www.aarp.org/online-community/groups/index.action?slGroupKey=bfd29a3f-dc19-40b8-ad47-eb7128c56793
Cindy Thorton Night Owls - Speed Painting - Abstract
<iframe title="YouTube video player" width="480" height="390" src="http://www.youtube.com/embed/NJUCQEYAiko" frameborder="0" allowfullscreen></iframe>
Golden Molding PASTE to make a smooth surface
<iframe title="YouTube video player" width="480" height="390" src="http://www.youtube.com/embed/NP3br4sx7Uo" frameborder="0" allowfullscreen></iframe>
Golden Tar Gel
<iframe title="YouTube video player" width="480" height="390" src="http://www.youtube.com/embed/LIqEm7Vrvbg" frameborder="0" allowfullscreen></iframe>
Making acrylic skins with Golden Products
<iframe title="YouTube video player" width="480" height="390" src="http://www.youtube.com/embed/miZFvyGrHdk" frameborder="0" allowfullscreen></iframe>
Watercolor Cattails
Paper Stretched on a bogo board... wet wash is on and dry.... so ready to do cattails
Flat brushes,dagger brush, rigger, palette knife, watercolor paper
Dagger brush for leaves
Double load brush - she uses a 3/4" flat brush to paint the cattail, then added the stem by using a palette knife.
Shows how to make the fuzz at the bottom of the cattail
http://www.gayleweisfield.com/
Flat brushes,dagger brush, rigger, palette knife, watercolor paper
Dagger brush for leaves
Double load brush - she uses a 3/4" flat brush to paint the cattail, then added the stem by using a palette knife.
Shows how to make the fuzz at the bottom of the cattail
http://www.gayleweisfield.com/
Saturday, February 19, 2011
Improve Your Watercolor with Chinese Techniques with Lian Quan Zhen
<iframe title="YouTube video player" width="480" height="390" src="http://www.youtube.com/embed/ZfVnMTWIpW0" frameborder="0" allowfullscreen></iframe>
Watercolour From Dark To Light With Jake Winkle
<iframe title="YouTube video player" width="640" height="390" src="http://www.youtube.com/embed/7k9INN5C-hY" frameborder="0" allowfullscreen></iframe>
Hazel Soan's Water Color Textures
<iframe title="YouTube video player" width="640" height="390" src="http://www.youtube.com/embed/yT3pnSzzIhY" frameborder="0" allowfullscreen></iframe>
Negative Painting by removing pigment
<iframe title="YouTube video player" width="640" height="390" src="http://www.youtube.com/embed/4B-JxHQgP6c" frameborder="0" allowfullscreen></iframe>
Painting outside the lines with Linda Kemp
<iframe title="YouTube video player" width="480" height="390" src="http://www.youtube.com/embed/0Bt0wi8d5AY" frameborder="0" allowfullscreen></iframe>
Soft Focus Watercolor Techniques
<iframe title="YouTube video player" width="480" height="390" src="http://www.youtube.com/embed/tTNbAfcC7ew" frameborder="0" allowfullscreen></iframe>
Don't start until the paper is no longer shiny
Positive Painting.. every stroke starts at the end
Part 1 Negative Painting in Watercolor
<iframe title="YouTube video player" width="480" height="390" src="http://www.youtube.com/embed/tTNbAfcC7ew" frameborder="0" allowfullscreen></iframe>
Part 2
Negative Painting in Watercolor
<iframe title="YouTube video player" width="480" height="390" src="http://www.youtube.com/embed/WovWlhZD1yw" frameborder="0" allowfullscreen></iframe>
Part 3
<iframe title="YouTube video player" width="480" height="390" src="http://www.youtube.com/embed/G3dzEeFpmi0" frameborder="0" allowfullscreen></iframe>
Soul Sketching - Mixed Media
<iframe title="YouTube video player" width="480" height="390" src="http://www.youtube.com/embed/pdRBo4gUJH8" frameborder="0" allowfullscreen></iframe>
Soul Sketching - Nature Collage with Image Transfer
<iframe title="YouTube video player" width="480" height="390" src="http://www.youtube.com/embed/d2h9kBu_iNo" frameborder="0" allowfullscreen></iframe>
Watercolor autumn leaves
<object style="height: 390px; width: 640px"><param name="movie" value="http://www.youtube.com/v/SeatLT0k0cI?version=3"><param name="allowFullScreen" value="true"><param name="allowScriptAccess" value="always"><embed src="http://www.youtube.com/v/SeatLT0k0cI?version=3" type="application/x-shockwave-flash" allowfullscreen="true" allowScriptAccess="always" width="640" height="390"></object>
watercolor demo
<iframe title="YouTube video player" width="480" height="390" src="http://www.youtube.com/embed/AsrCKv26Rz0" frameborder="0" allowfullscreen></iframe>
Loose Watercolor Demo
<object width="640" height="390"><param name="movie" value="http://www.youtube.com/v/odM1FAVM7dk&hl=en_US&feature=player_embedded&version=3%22%3E%3C/param%3E%3Cparam name="allowFullScreen" value="true"></param><param name="allowScriptAccess" value="always"></param><embed src="http://www.youtube.com/v/odM1FAVM7dk&hl=en_US&feature=player_embedded&version=3" type="application/x-shockwave-flash" allowfullscreen="true" allowScriptAccess="always" width="640" height="390"></embed></object>
Part 2
<object width="640" height="390"><param name="movie" value="http://www.youtube.com/v/rBFj8qDnNjQ&hl=en_US&feature=player_embedded&version=3%22%3E%3C/param%3E%3Cparam name="allowFullScreen" value="true"></param><param name="allowScriptAccess" value="always"></param><embed src="http://www.youtube.com/v/rBFj8qDnNjQ&hl=en_US&feature=player_embedded&version=3" type="application/x-shockwave-flash" allowfullscreen="true" allowScriptAccess="always" width="640" height="390"></embed></object>
Friday, February 18, 2011
Watercolor University
Rent 3 videos a month for $22... free shipping...
http://smartflix.com/store/video/6221/Watercolor-Universitywhat a deal!
http://smartflix.com/store/video/6221/Watercolor-Universitywhat a deal!
Monday, February 14, 2011
Sunday, February 13, 2011
Abstract Painting Instructions
This comes from About.com... a WONDERFUL source of "how to do" anything

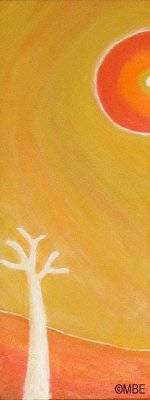
Abstracted Painting ‘Heat’ Step 1: Blocking in the Base Color
Image: © Marion Boddy-Evans. Licensed to About.com, Inc
.This painting isn't a pure abstract, but rather an abstraction created from a 'real' landscape. It was done in acrylic using the following colors: titanium buff, titanium white, cadmium scarlet, cadmium orange, Mars orange (a mixture of PY42 and PR101), and Turner’s yellow (a lovely ‘dirty’ yellow from Liquitex, made from arylide yellow PY3 and yellow oxide PY42). It’s painted on canvas, size 250x650mm (about 10x26 inches). I bought a few of these unusually proportioned canvases when I saw them in my local art-supply shop because the shape appealed to me and I thought they’d work well with some kind of tree subject.
I set out knowing it was going to be far more of an abstract painting, with colors that reflected the intense heat and dryness of the area where these grow. I did a few thumbnail sketches with the shape of my canvas in mind, then picked my favorite and got painting. I started by sketching in the elements of the abstract painting with a pencil (you can’t see this very clearly in the photo). Then, using a size 12 filbert brush, I painted the first color in, the Turner’s yellow. Look closely and you’ll see the brush strokes follow or echo the half-circle of the sun as well as the horizontal band at the bottom.
I left the part of the sun I would be painting scarlet and orange white as I would be using these colors straight from the tube for the intense sun and, as they’re both quite opaque colors, they’d just hide any Turner’s yellow anyway.

demonstrations
2 of 9Previous NextAbstracted Painting ‘Heat’ Step 2: Adding Other Colors
Image: © Marion Boddy-Evans. Licensed to About.com, Inc
.Using cadmium orange and cadmium scarlet, I painted in the circles of the sun. I blended in the edges of the two colours before the paint had dried so the colors run smoothly into each other, rather than there being a sharp edge.
I echoed the curve of the sun with two bands of orange, one pale and one quite strong. The effect isn’t very subtle and you’ll see in Step 3 that I worked on this. You still can see the white of the basic tree shape.
I put some cadmium orange in a horizontal band at the bottom to start defining the land, but it doesn’t make for a pleasing composition. The shape of the land or foreground isn’t dynamic enough and the rectangular block is at odds with the semi-circle of the sun and ‘sky’.

demonstrations
3 of 9Previous NextAbstracted Painting ‘Heat’ Step 3: Softening the Colours
Image: © Marion Boddy-Evans. Licensed to About.com, Inc
.There are two major differences between Step 2 and what you see in the photo here, Step 3. First is that I’ve changed the foreground from a horizontal block to a curved line, more like a hill. The curve is gentle, yet it feels like it’s got an affinity with the sun.
The second is that I’ve blended in the colors of the sky, making the orange echoes of the sun’s shape far more subtle. This was done by adding some more Turner’s yellow in a thin glaze so that the orange would show through. Then adding some more cadmium orange to this before it was dry, blending it with the yellow on the canvas.
Finally I added the titanium white line around the sun and on the top of the hill. I don’t often use pure white in a painting, but as this is an abstraction it felt right. To me it emphasizes the strong heat and bright glare of the midday sun
The next thing was to paint in the tree. It’s done using titanium white for the ‘sun side’ and titanium buff for ‘shadow side’. I initially thought the tree would be small and simple, with only a few branches as you see here. But the result if weak, it looks like an afterthought, rather than the dominant focus of the painting
Abstracted Painting ‘Heat’ Step 5: Reworking the Tree
Resisting my “I’m going to muck it all up” fear, I painted out the top of the tree. I reworked the ‘sky’ until it was right again, knowing that I wanted it to be finished before I painted in the tree again. I didn’t want to have to try and paint the ‘sky’ around the finished tree. I wanted the freedom to use a sweeping, uninterrupted brushstroke as I put in the curves in the sky that echo the sun’s curve.

Abstracted Painting ‘Heat’ Step 6: Close-up of the Tree
I bet you’re wondering, why has the branches of the tree got orange on it now when I said I used only titanium white and buff on it? Well, it was an attempt to try to give the reworked tree a bit of interest, so that it wouldn’t just be painted in a solid titanium white and titanium buff. The intent was that some of the orange would show through slightly.
After the reworked ‘sky’ had dried (see Step 5), I painted the trunk of the tree taller and added a whole lot of branches, making a proud tree with a lot of presence. I then painted some cadmium scarlet and orange on the branches, and waited for this to dry. I then painted titanium white and titanium buff over the branches; both these are quite opaque paints, so the effect of the underlying orange is subtle, and you have to look closely to see it in the final painting

I was happy with this, second version of the tree.The fact that the branches go off to the left of the canvas gives you a sense that the whole story of the painting is not encapsulated on the canvas. Your mind fills in the branches to the left where they go off the edge of the canvas. The tree also stretches into the top half of the canvas and almost all the way across the canvas, so it really dominates.
I really liked the tree, but still felt there was something missing. That the painting needed another a third element -- see Composition Class: Number of Elements for why an odd number of elements is better than an even number
 demonstrations
8 of 9Previous NextAbstracted Painting ‘Heat’ Step 8: Adding Another Element
Image: © Marion Boddy-Evans. Licensed to About.com, Inc
.Having decided that the composition needed another element, I decided that it was going to be another tree, I cut two different-sized trees out of paper. Using cut-outs like this enables you to play around with the composition quickly, to try out various positions for the elements, without constantly painting it in and taking it out (and stressing that you’re quick enough to do this before the paint dries, if you use acrylics like I do) -- see Composition Class: Using Cut-outs.
The photo above shows the smaller of the two cut-out trees, which is far too small. It’s lost in the painting, looking more like an accidental smear of white paint than an element of the composition. The second of the cut-outs was the size of the tree you can see in the finished painting. It’s large enough to be noticed, doesn’t try to dominate or compete with the main tree, rather gives it a sense of scale or proportion to the painting, even though it’s quite abstracted.

This is the final painting. I’m very pleased with it and have had quite a bit of positive feedback on it. I like the changes of color in the ‘sky’, the final proportions of the trees, the angled line of the ground. Following this I painted several other paintings using the same colors and subject, though in all of those I’ve used the canvas as a landscape.
I also sat down with my sketchbook (for once!) and put down a lot of other potential compositions that could be part of a series. I even found myself doodling potential compositions when I was stuck in a boring meeting rather than my usual flowerpots, spirals, and triangles.
Then I started contemplating what it would look like if I painted the same scene but with blues, greys, and whites, as if by moonlight rather than sunshine. One painting leads to the next, and to the next… As it says in Art and Fear, don’t let “your current goal become your only goal. With individual artworks it means leaving some loose thread, some unresolved issue, to carry forward and explore in the next piece.”

Abstracted Painting ‘Heat’ Step 1: Blocking in the Base Color
Image: © Marion Boddy-Evans. Licensed to About.com, Inc
.This painting isn't a pure abstract, but rather an abstraction created from a 'real' landscape. It was done in acrylic using the following colors: titanium buff, titanium white, cadmium scarlet, cadmium orange, Mars orange (a mixture of PY42 and PR101), and Turner’s yellow (a lovely ‘dirty’ yellow from Liquitex, made from arylide yellow PY3 and yellow oxide PY42). It’s painted on canvas, size 250x650mm (about 10x26 inches). I bought a few of these unusually proportioned canvases when I saw them in my local art-supply shop because the shape appealed to me and I thought they’d work well with some kind of tree subject.
I set out knowing it was going to be far more of an abstract painting, with colors that reflected the intense heat and dryness of the area where these grow. I did a few thumbnail sketches with the shape of my canvas in mind, then picked my favorite and got painting. I started by sketching in the elements of the abstract painting with a pencil (you can’t see this very clearly in the photo). Then, using a size 12 filbert brush, I painted the first color in, the Turner’s yellow. Look closely and you’ll see the brush strokes follow or echo the half-circle of the sun as well as the horizontal band at the bottom.
I left the part of the sun I would be painting scarlet and orange white as I would be using these colors straight from the tube for the intense sun and, as they’re both quite opaque colors, they’d just hide any Turner’s yellow anyway.

demonstrations
2 of 9Previous NextAbstracted Painting ‘Heat’ Step 2: Adding Other Colors
Image: © Marion Boddy-Evans. Licensed to About.com, Inc
.Using cadmium orange and cadmium scarlet, I painted in the circles of the sun. I blended in the edges of the two colours before the paint had dried so the colors run smoothly into each other, rather than there being a sharp edge.
I echoed the curve of the sun with two bands of orange, one pale and one quite strong. The effect isn’t very subtle and you’ll see in Step 3 that I worked on this. You still can see the white of the basic tree shape.
I put some cadmium orange in a horizontal band at the bottom to start defining the land, but it doesn’t make for a pleasing composition. The shape of the land or foreground isn’t dynamic enough and the rectangular block is at odds with the semi-circle of the sun and ‘sky’.

demonstrations
3 of 9Previous NextAbstracted Painting ‘Heat’ Step 3: Softening the Colours
Image: © Marion Boddy-Evans. Licensed to About.com, Inc
.There are two major differences between Step 2 and what you see in the photo here, Step 3. First is that I’ve changed the foreground from a horizontal block to a curved line, more like a hill. The curve is gentle, yet it feels like it’s got an affinity with the sun.
The second is that I’ve blended in the colors of the sky, making the orange echoes of the sun’s shape far more subtle. This was done by adding some more Turner’s yellow in a thin glaze so that the orange would show through. Then adding some more cadmium orange to this before it was dry, blending it with the yellow on the canvas.
Finally I added the titanium white line around the sun and on the top of the hill. I don’t often use pure white in a painting, but as this is an abstraction it felt right. To me it emphasizes the strong heat and bright glare of the midday sun

The next thing was to paint in the tree. It’s done using titanium white for the ‘sun side’ and titanium buff for ‘shadow side’. I initially thought the tree would be small and simple, with only a few branches as you see here. But the result if weak, it looks like an afterthought, rather than the dominant focus of the painting
Abstracted Painting ‘Heat’ Step 5: Reworking the Tree
Resisting my “I’m going to muck it all up” fear, I painted out the top of the tree. I reworked the ‘sky’ until it was right again, knowing that I wanted it to be finished before I painted in the tree again. I didn’t want to have to try and paint the ‘sky’ around the finished tree. I wanted the freedom to use a sweeping, uninterrupted brushstroke as I put in the curves in the sky that echo the sun’s curve.

Abstracted Painting ‘Heat’ Step 6: Close-up of the Tree
I bet you’re wondering, why has the branches of the tree got orange on it now when I said I used only titanium white and buff on it? Well, it was an attempt to try to give the reworked tree a bit of interest, so that it wouldn’t just be painted in a solid titanium white and titanium buff. The intent was that some of the orange would show through slightly.
After the reworked ‘sky’ had dried (see Step 5), I painted the trunk of the tree taller and added a whole lot of branches, making a proud tree with a lot of presence. I then painted some cadmium scarlet and orange on the branches, and waited for this to dry. I then painted titanium white and titanium buff over the branches; both these are quite opaque paints, so the effect of the underlying orange is subtle, and you have to look closely to see it in the final painting

I was happy with this, second version of the tree.The fact that the branches go off to the left of the canvas gives you a sense that the whole story of the painting is not encapsulated on the canvas. Your mind fills in the branches to the left where they go off the edge of the canvas. The tree also stretches into the top half of the canvas and almost all the way across the canvas, so it really dominates.
I really liked the tree, but still felt there was something missing. That the painting needed another a third element -- see Composition Class: Number of Elements for why an odd number of elements is better than an even number

8 of 9Previous NextAbstracted Painting ‘Heat’ Step 8: Adding Another Element
Image: © Marion Boddy-Evans. Licensed to About.com, Inc
.Having decided that the composition needed another element, I decided that it was going to be another tree, I cut two different-sized trees out of paper. Using cut-outs like this enables you to play around with the composition quickly, to try out various positions for the elements, without constantly painting it in and taking it out (and stressing that you’re quick enough to do this before the paint dries, if you use acrylics like I do) -- see Composition Class: Using Cut-outs.
The photo above shows the smaller of the two cut-out trees, which is far too small. It’s lost in the painting, looking more like an accidental smear of white paint than an element of the composition. The second of the cut-outs was the size of the tree you can see in the finished painting. It’s large enough to be noticed, doesn’t try to dominate or compete with the main tree, rather gives it a sense of scale or proportion to the painting, even though it’s quite abstracted.

This is the final painting. I’m very pleased with it and have had quite a bit of positive feedback on it. I like the changes of color in the ‘sky’, the final proportions of the trees, the angled line of the ground. Following this I painted several other paintings using the same colors and subject, though in all of those I’ve used the canvas as a landscape.
I also sat down with my sketchbook (for once!) and put down a lot of other potential compositions that could be part of a series. I even found myself doodling potential compositions when I was stuck in a boring meeting rather than my usual flowerpots, spirals, and triangles.
Then I started contemplating what it would look like if I painted the same scene but with blues, greys, and whites, as if by moonlight rather than sunshine. One painting leads to the next, and to the next… As it says in Art and Fear, don’t let “your current goal become your only goal. With individual artworks it means leaving some loose thread, some unresolved issue, to carry forward and explore in the next piece.”
Sgraffito with Watercolors
Sgraffito on paper works differently to sgraffito on canvas because the layer of paint is (generally) so thin you’re scratching the paper as well as the paint. Where you scratch or indent the surface of the paper, the wet, top paint will collect in it, rather than revealing the white of the paper. If the paint's beginning to dry, less will flow in.
Using a knife, sharp blade or sandpaper to scratch the surface of a watercolour can be very effective for creating texture, but remember you’ll have ‘damaged’ the surface of the paper and it’ll be very absorbent (porous) if you paint on it again.
If you add a little gum arabic to your watercolours, the paint will have more body and sgraffito marks will be more prominent, or defined.
Watercolor Paper
Does watercolor paper have a right and a wrong side?
There is a difference between the two sides of a sheet of watercolor paper, with one side usually slightly smoother (less hairy) than the other. But I'm not sure I'd label them "right" and "wrong" because which was which would depend on what you require from your watercolor paper.
The smoother side of a paper is better if you're painting a lot of detail, while the hairier side is better if you're wanting to build up color by using use lots of glazes.
Watercolor paper is divided into three categories according to the surface of the paper: rough, hot-pressed (HP), and cold-pressed (NOT).
As you'd expect from the name, rough watercolor paper has the most textured surface, or most prominent tooth. It's sometimes described as having a pebbly surface, a series of irregular rounded shapes like a pebble beach. On rough paper the paint from very watery washes tends to collect in the indentations in the paper, creating a grainy effect when the paint dries. Alternately, if you whisk a dry brush lightly across the surfaces, you'll apply paint only to part of the paper, the tops of the ridges and not in the indentations. Rough paper is generally not regarded as a good paper for painting fine detail, but is excellent for a loose, expressive style of painting.
Hot-pressed watercolor paper has smooth surface with almost no tooth. It's smooth surface is idea for painting fine detail and for even washes of color. Beginners sometimes have problems with the paint sliding around on the smooth surface.
Cold-pressed watercolor paper is sometimes called NOT paper (as in not hot pressed). It's the paper in between rough and hot-pressed paper, having a slightly textured surface. Cold-pressed is the most commonly used watercolor paper surface as it allows for a good amount of detail while also having some texture to it.
Soft-pressed watercolor paper is in between hot-pressed and cold-pressed, with a slight tooth. It tends to be very absorbent, sucking in paint, making it harder to paint dark or intense colors.
Once again it's important to remember that surfaces vary from manufacturer to manufacturer. The thickness of a sheet of watercolor paper is measured by weight. So, logically, the greater the weight, the thicker the sheet. It is measured either in pounds per ream (lb) or grams per square meter (gsm). The standard weights of paper are 90 lb (190 gsm), 140 lb (300 gsm), 260 lb (356 gsm), and 300 lb (638 gsm).
Thinner paper needs to be stretched to prevent it from buckling or warping when you paint on it. How thick the paper needs to be before you can happily paint away on it without buckling does depend on how wet you tend to make the paper as you paint. Experiment with different weights to see, though it's likely you'll find that paper less than 260 lb (356 gsm) wants to be stretched.
Not having to stretch it is not the only reason for using heavier paper. It'll also stand up to more abuse, and take a greater number of glazes.
STRETCHING WATERCOLOR PAPER
It's generally recommended that watercolor paper less than 356 gsm (260 lb) is stretched before use, otherwise it'll warp. It's a simple process.
Difficulty: Average
Time Required: On-going
Here's How:
1.Cut four strips of gummed brown tape, one for each side (edge) of the piece of watercolor paper. Cut these slightly longer than the sides. Put them aside for the moment.
2.Soak a sheet of watercolor paper in cold water for a couple of minutes. This is to allow the fibers in the paper to expand.
3.Lift the sheet of watercolor paper and gently shake off the excess water. Place it on a drawing board, which must be lying flat.
4.Smooth the watercolor paper out with a clean sponge (preferably) or your fingers (but wash them first to get any grease off them). If the sheet of watercolor paper not perfectly smooth at this stage, it won't dry smooth.
5.Moisten a strip of gummed tape and stick it down firmly alone one side so that one third of the tape is on the paper and two-thirds on the board. This will stop the watercolor paper pulling off the board when it dries.
6.Tape down the other sides of the sheet of watercolor paper in the same way.
7.Leave to dry for several hours, away from direct heat. As the water evaporates, the fibers in the paper contract, leaving the sheet of watercolor paper flat.
8.Keep the board flat while the watercolor paper dries, otherwise the water will drain to one edge and the paper will drive unevenly.
9.When you paint on the watercolor paper, it'll stay flat because you won't ever soak the whole piece as much as you did in step one.
Tips:
1.Don't use hot water to soak your watercolor paper as this could remove the sizing from the paper, and don't soak it for too long for the same reason. Sizing is added to watercolor paper to reduce its absorbency.
2.Use different color sponges for smoothing a piece of paper and moistening gummed tape so you never run the risk of getting gum on your sheet of watercolor paper.
3.If you don't get on with gummed brown tape, an alternative method is to staple the paper down onto the board instead.
4.You may be able to peel off some of the tape, but be careful not to tear the paper. Rather just trim off the edges of the paper or hide them under a mount.
What You Need:
•Watercolor paper
•Drawing board
•Gummed brown tape
•Two sponges
Calligraphy
Fragments de Memoires
By Casanova. 2005
http://www.calligraphycentre.com/GinaforCheerio.pdf
http://www.bnart.be/home.html
http://cdn.johnnealbooks.com/downloads/lr21-4pgs.pdf
By Casanova. 2005
http://www.calligraphycentre.com/GinaforCheerio.pdf
http://www.bnart.be/home.html
http://cdn.johnnealbooks.com/downloads/lr21-4pgs.pdf
Twisting - a Trick of Chinese Brush Painting
Tip - Soak or Wet Brush first, use paper towel to absorb extra moisture before loading with sumi ink. Use a soft brush.
Feet flat on the floor... use shoulder to move the arm...not your wrist.
Practice on old newspapers...twist to change directions.
Step by Step _Watercolor - Painting Duckling
http://www.artinstructionblog.com/watercolor-painting-demonstration-fluffy-young-duckling
About the Artist - Dawn McLeod Heim, author of the book “Step-by-Step Guide to Painting Realistic Watercolors“.
Over the years I have had numerous inquiries and requests to create a website not only geared towards learning how to paint watercolor in a realistic manner, but also a place that fellow watercolor enthusiasts can have the opportunity to purchase and paint the class projects that I have taught my students.
My Website: http://www.watercolorpaintingandprojects.com/
Saturday, February 12, 2011
Thursday, February 10, 2011
Wednesday, February 9, 2011
Tuesday, February 8, 2011
Monday, February 7, 2011
Sunday, February 6, 2011
Texture Techniques for Watercolors
http://www.wetcanvas.com/ArtSchool/Watercolors/Textures/index.html
Watercolor Demonstration - splashing paint - John Lovett
I love his work........check out the links!
http://www.johnlovett.com/techniq.htm
LESSONS http://www.johnlovett.com/class.htm
BLOG http://splashingpaintblog.com/?blogsub=confirming#subscribe-blog
Watercolor Simplified with Pat Weaver
The ink is Art Spectrum Burnt Sienna Pigment Ink - insoluble once dry.
Saturday, February 5, 2011
How to Make A Magnetic Board
This video used galvanized step flashing from Lowe's... take a magnet with you to be sure what you are buying will allow magnets to stick to it.
Friday, February 4, 2011
Decoupage on Wicker
Get an old wicker basket from a garage sale... pre-glue it with Elmer's Glue All and apply napkins ....so easy.
Let the glue set up before applying.
Let the glue set up before applying.
HEART ROSES FROM KATES PAPERIE

I love Kate's Paperie, click on the link below and you will too!
http://www.katespaperie.com/assets/kates/articles/0012/9214/Heart_Flowers.pdf
Thursday, February 3, 2011
Subscribe to:
Posts (Atom)